I have tried to provide an accurate account of what I have done. I accept no responsibility for any damage or injury that results from the application of this information. If you decide to follow these instructions, it is your responsibility to verify that they make sense and that you have a satisfactory understanding of electronics beyond what is provided here. I welcome comments and suggestions but regret that I cannot provide assistance with electronic design or assembly.
After the unfortunate meltdown of my first buzzer, I built an improved version. It is in a larger enclosure from Radio Shack, about as large as a deck of cards, but thicker. This enclosure was the smallest I could find that included a matching proto-board.
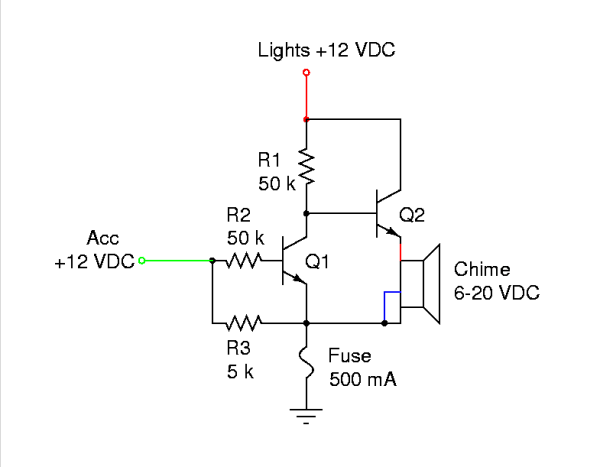
This design incorporates R3, the resistor added to deal with my CD receiver's power leak. It also includes an inline 500 mA fuse, to reduce the likelihood of another meltdown. In place of the 12 VDC buzzer, I used a Radio Shack 6-20 VDC "electronic chime." It produces a loud doorbell-like chime. It has three leads; red and black for power and ground, and blue for a switch. The chime will play a chime if the blue wire is momentarily grounded with a switch. For purposes of this circuit, the blue wire is tied to ground so that the chime sounds whenever power is supplied. The chime was $10, which is substantially more expensive than the buzzer, but sounds much more refined.
The parts listed here are what I actually used, but you have considerable latitude to substitute (see above). I purchased them at the Mar-Vac Electronics store and Radio Shack in Pasadena, CA.
| Component | Description |
| R1, R2 | 51 kOhm; 1/2 watt |
| R3 | 5.1 kOhm; 1/2 watt |
| Q1, Q2 | MPSA13 Darlington NPN transistor V(BR)CES = 30V |
| Chime | 6-20 VDC, RS P/N ??? |
| Fuse | 500 mA slow-blow inline |
| Connectors (ACC, Lights, GND) | 16-14 GA .250 quick slide female |